

PROJECTION SURFACES CLASSIC TYPES
DIFFUSION SURFACES
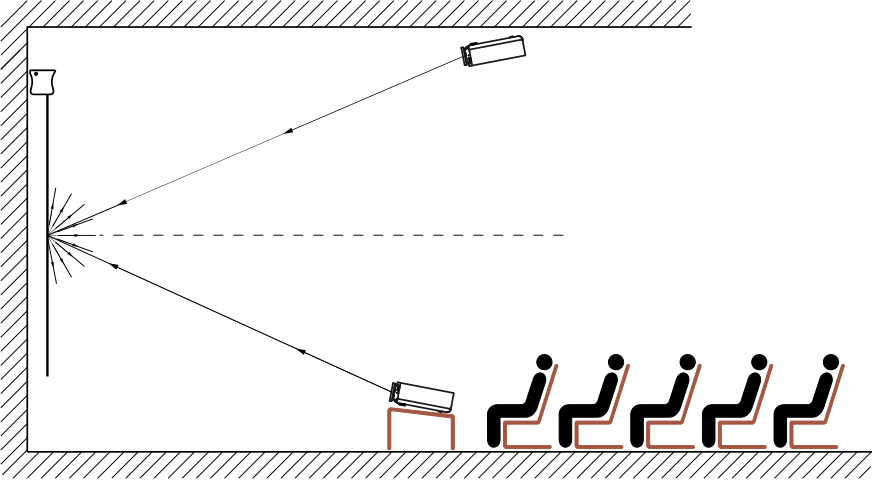
They reflect light evenly diffusing it into the space with wide viewing angle. The Gain of the diffusion surfaces is very close to 1. The pro- jector installation method (ceiling, table, with optical angle shift) do not change the quality of the picture displayed at the diffusive surface. Matt White, Matt Grey, White Ice fabrics and White Glass panel are diffusion projection surfaces.
REFLECTIVE SURFACES
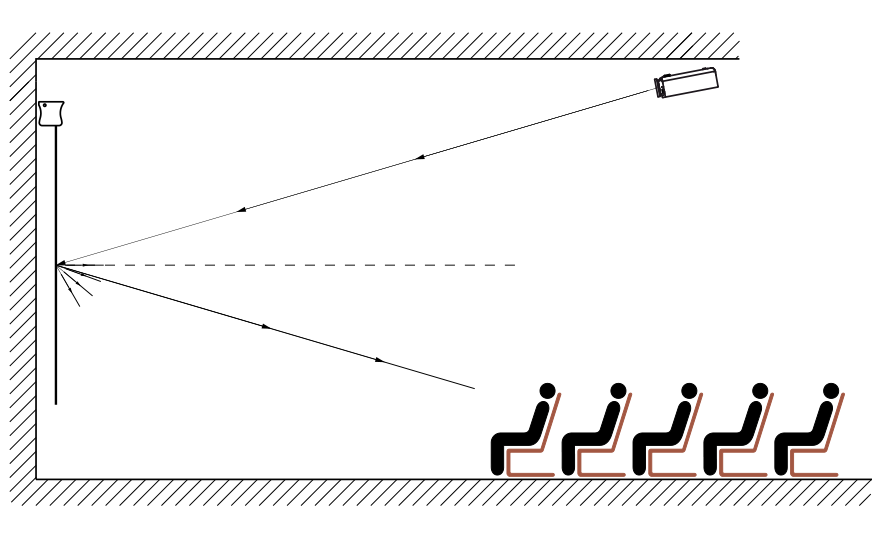
They reflect light directionally into the space similar as mirror. Such re- flection characteristics offers higher picture brightness when observed from the direction the light is reflected to, but the viewing angle is limited. Typical Gain values of reflective surfaces are from the range between 1,5 and 3,0. Projection systems with reflective surfaces re- quireesxact positioning of projector, screen and audience. Silver P fab- rics reflective projection surface.
RETRO-REFLECTIVE SURFACES
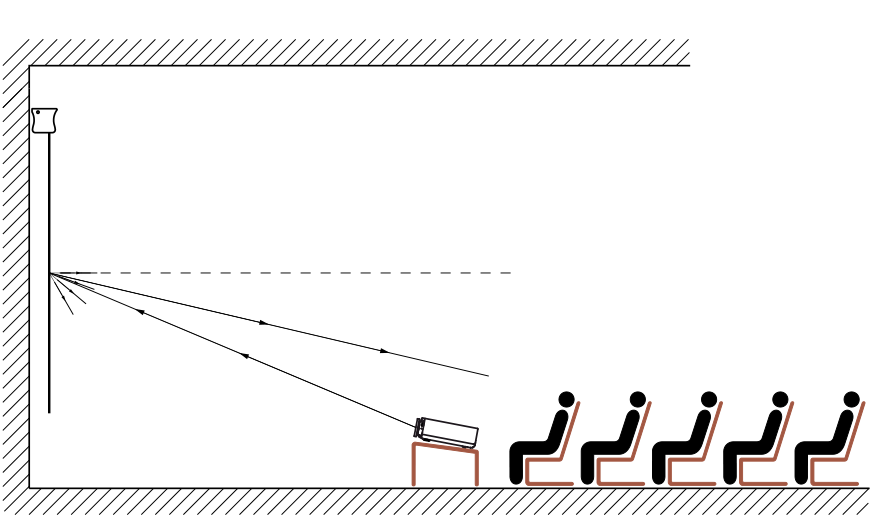
They reflect light directionally back to the light source. High picture brightness will be observed from the right direction or the very nar- row viewing angle. Typical Gain values of retro-reflective surfaces are from 2,0 to 2,5. Projection systems with retro-reflective surfaces re- quires projector and audience to be located at the same level and di- rection. Glass Beaded projection fabrics are retro-reflective surfaces.
DIFFUSION-REFLECTIVE SURFACES
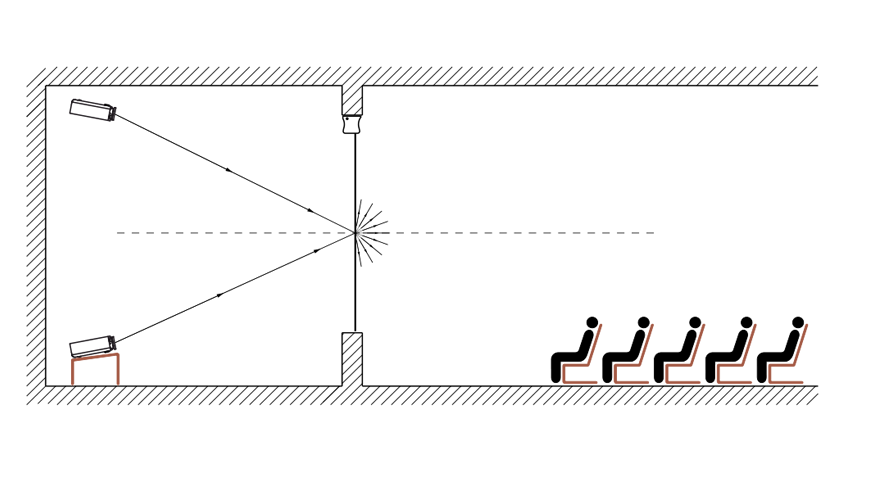
They transmit and diffuse light into the space. High picture brightness is guaranteed at limited viewing angle only. Typi- cal Gain values of diffusion-reflective surfaces are from the range 2,5 to 4.0. Projection systems with diffusion-reflective surfaces requires precise positioning of projector, screen and audience due to very narrow surface viewing angle. Rear pro- jection fabrics New Coral and Rear projection panels Grey Glass are Diffusion-reflective surfaces.
ALR – The New generation of projection surfaces
Picture projection at classic projection surfaces requires strict control and limitation of ambient light at projection. Good picture quality would be reached as an effect of optimal selection of projector brightness, picture area size and type of projection Surface(described with value of GAIN , the relative reflection coefficient) at projection room with limited ambient light level. The natural ambient light level is not constant. It would vary depending on the season, time of day and weather conditions at very wide range. Real ambient light level at projection room would exceed many times the ambient light level taken for optimal picture calculation. Such big discrepancies effects at depreciation of colour saturation, increased picture brightness and depreciation of contrast level . The main reason of described inconvenience is linear light reflection characteristic of classic projection surfaces. Linear light reflection characteristic means the Surface reflects the rays of light emitted by the projector in the same way as rights of light emitted by other light sources located inside projection room or out of it.
Many years of research work and design activities were taken to invent projection surfaces reflecting light emitted by projector and rejecting rays of light emitted by other sources. Numerous individual solutions were invented as a result, but each of them required a proper projector to be located precisely versus projection screen for proper operation. Individually designed solutions have never been cost effective.
“Ambient Light Rejection” is the principle of operation of projection surfaces. The principle’s acronym became a name of whole group of projection surfaces operating this way. Mass manufacturing of ALR projection surfaces became possible as a result of technological breakthrough.
Front surface of ALR projection surface is usually dark grey or even black when observed in daylight, so dark areas of projected pictures stay visible in wide range of ambient light level much better than at classic projection surfaces. ALR surfaces would operate successfully with many standard throw projectors of different design of projection length, however short and ultrashort throw projectors require for proper operation ALR surfaces dedicated for short throw projection.
The following pictures present real projection of the same picture at four samples of projection surfaces . Two samples are classic projection surfaces Matt White (Gain 1.0) and Matt Grey (Gain 0.8) (both represent diffusive characteristics), the third sample Gain (0.8) despite of manufacturer’s declaration did not showed it's ALR characteristics and the last sample is projection surface Matt Grey ALR (Gain 0.8).
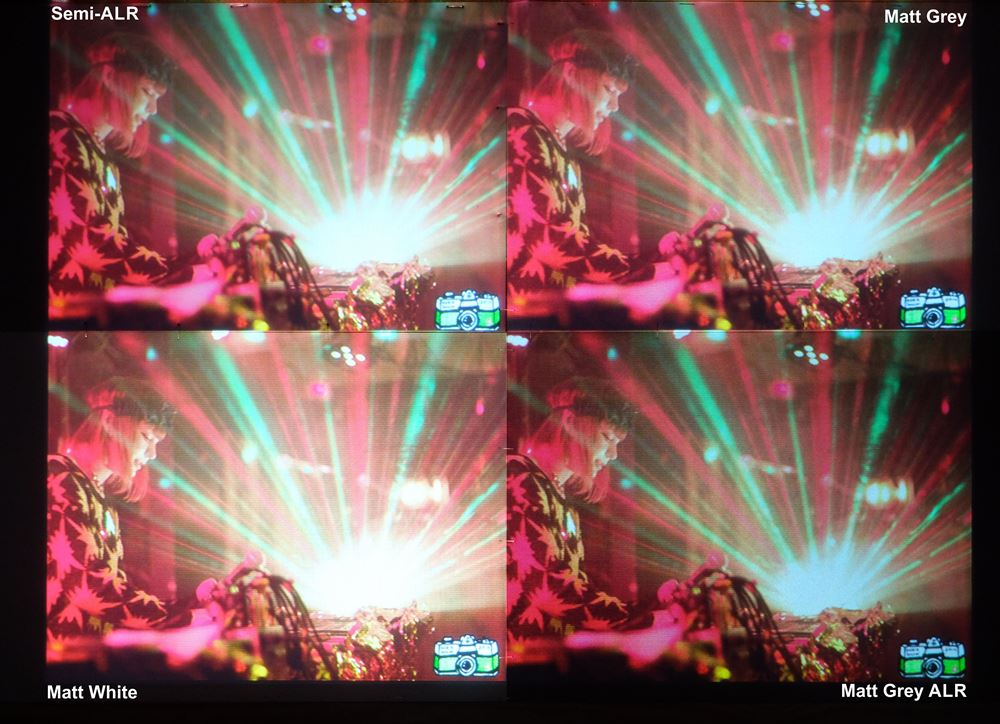
During projection in no ambient light conditions pictures projected at all samples offer correct colour reproduction and brightness related to the Gain value of related projection surface. Our camera has calculated picture exposure parameters for the average brightness level so picture at the Matt White surface area is overexposed, real picture looked correctly and it was 20% brighterthan pictures projected at other surfaces.
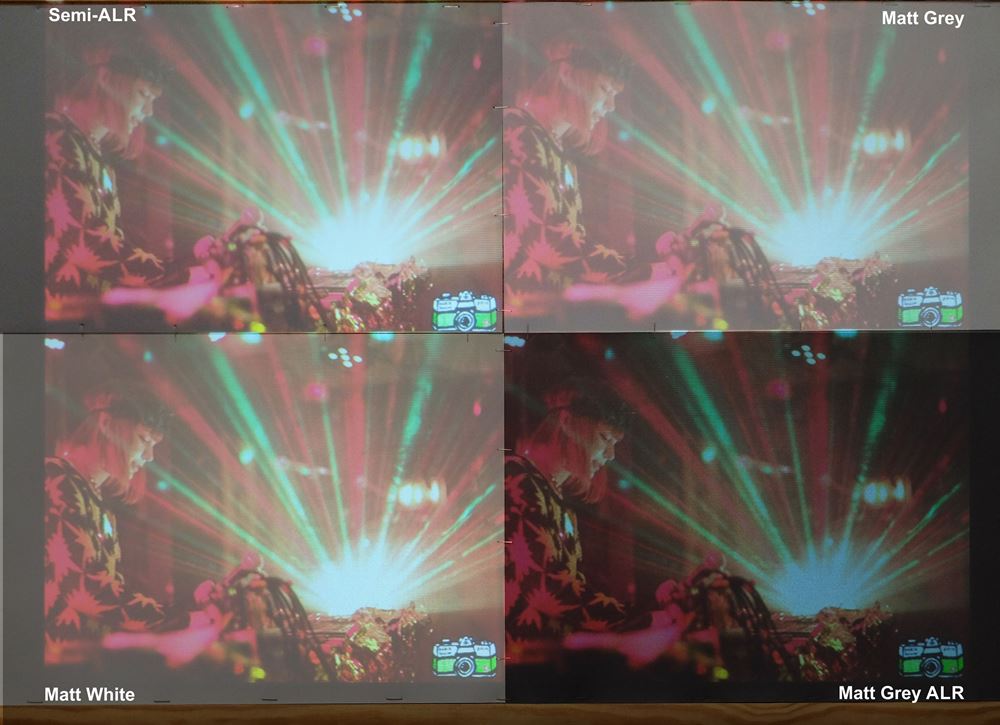
Summary , unique characteristics of ALR projection Surface lets enjoy good quality picture during projections performed at limited ambient light condition as well as during projections performed when the ambient light is not switched off. ALR Surface based projection screens allows our projections to become independent from the light conditions at the projection room.
We fairly recommend Matt Grey ALR projection Surface for the Home Cinema projections. It would restore content of your slides lost by ambient light conditions during business presentation.
SCREEN BORDER
BLACK SCREEN BORDER
Projection screens should have black borders. It is not just a decorative element, but it improves perception of the projected picture quality. The black border sep-a rates optically the picture from the background and limits viewers attention to the displayed content. The projected picture surrounded with black bordering is recognized as brighter and higher contrast than picture projected at the same surface but without black borders. On top of that the black borders moves the projected image away from the fabrics edges, so any surface flatness imperfections happening at the fabrics side edges will not affect the image quality. Additional black belt over the picture area is required to lower the position of the picture area, so it’s bottom edge would be at the ergonomic height. Additional advantage of the wide top border is reduction of light reflected from the screen to the ceiling and increasing ambient light level at the area.
VIRTUAL BLACK SCREEN BORDER
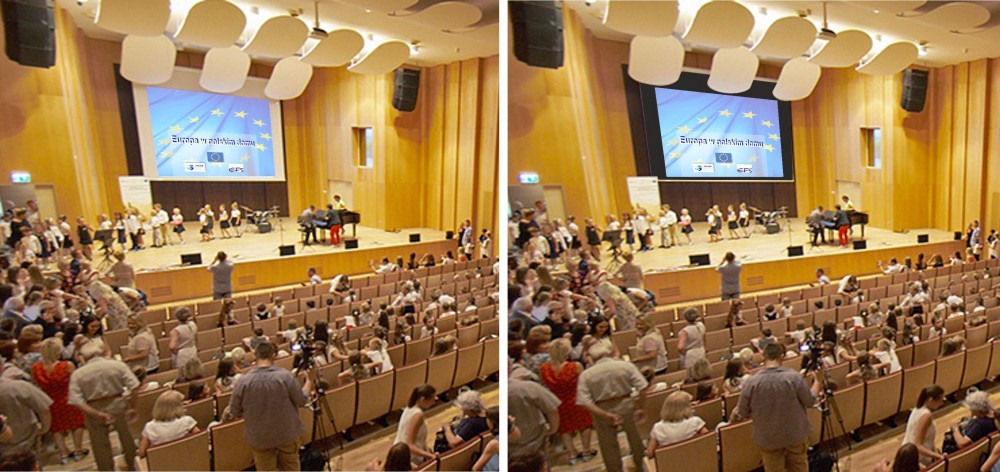
It is available at screens with Matt Grey ALR projection surface, which has dark grey front surface. When projected picture is smaller than screen's projection surface size part not used for projection becomes virtual screen border. Virtual black border exists only during picture projection and it remains invisible when the projector lamp is off. During picture projection Virtual black borders improves perception of projected picture quality in the same way as the Black screen border at classic projection surfaces. Virtual black screen border has advantages versus classic version:
1) User can scale width of Virtual Black Border just by changing size of projected picture with projector's ZOOM function. Everybody can match width of virtual border with personal feelings.
2) Virtual screen border always matches projected picture.
3) Virtual screen border matches has plenty picture aspect ratios. Projected picture of any aspect ratio will be surrounded by Virtual screen border.
PROJECTION SCREENS - GENERAL INFORMATIONS
Picture projection is a picture phenomenon, it seems to be very easy and non prob- lematic. The picture is a result of reflection of the light from the projector and envi- ronment light at the surface of the projection screen. The projection fabrics is the main and most important screen component. Type of projection surface and it’s optical parameters decides about the picture quality and presentation. Fabrics char- acteristics are described with the following parameters: Gain and viewing angle. Relative reflection coeffcient called Gain, describes the amount of light reflected by the surface related to the amount of light reflected by the standard surface. Stand- ard surface is covered either with either magnesium carbonate (MgCO3) either ti- tanium dioxide (TiO2). Both chemical substances are white and they reflect light lossless. Standard fabrics gain is 1.
Viewing angle describes the maximum angle the projected picture could be ob- served without quality decrease. The picture brightness is higher when observed perpendicularly to the surface and decreases with the increase of the viewing angle. The angle, observed picture brightness decreases to 50% of the maximum value is declared as fabrics Viewing Angle. There is close relation between the Viewing angle and Gain parameters. The surfaces with large Gain has Viewing Angle smaller then surfaces with small Gain.
Depending on the light reflection characteristics there are the following pro- jection surfaces: diffusion, reflective, retro-reflective and diffusion-reflective.
PROJECTION SCREEN SELECTION RULES
1) TYPE OF SCREEN
There are many types of screens at our offer:
- Electric projection screens
- Manually operated projection screens
- Frame screens for fixed installations
- Portable projection screens
Portable projection screens are recommended if you plan to project pictures at dif- ferent places and in different conditions. In case of fixed screen installation the selection of electric, manually operated or fixed frame screen depends on the user’s individual preferences and planned budget.
2) PICTURE ASPECT RATIO
Projection devices display the images of the width to height ratio determined by the unit construction. It is called picture aspect ratio. Projection screen viewing area should have the same aspect ratio as the projection device used in the system. This will guarantee optimal projection performance.
Typical aspect ratios of projection devices and screens:
- 1:1 Full aspect ratio
- 4:3 Video aspect ratio
- 16:9 HDTV wide aspect ratio
- 16:10 PC wide aspect ratio
- 21:9 Cinemascope aspect ratio
3) SCREEN SIZE AND INSTALLATION
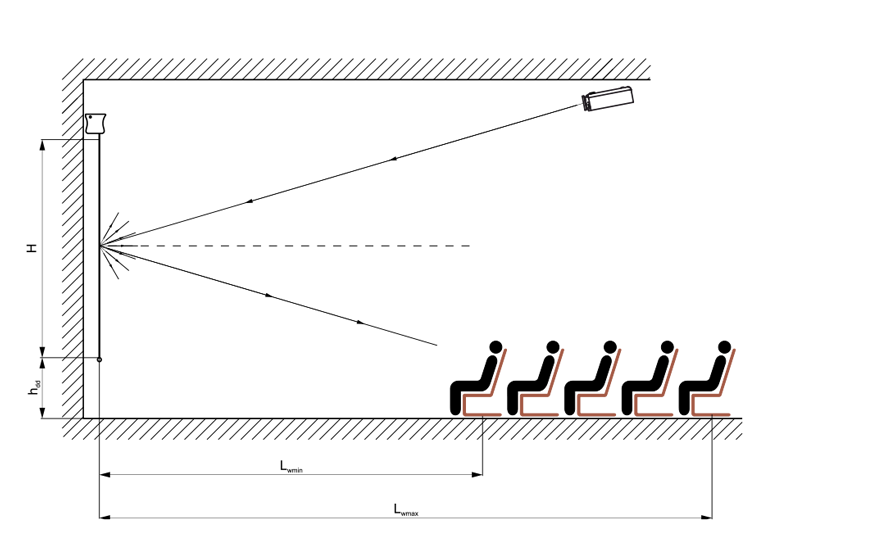
Select the screen size and installation method following the rules described below. - Screens size. Distance between the last row of audience and the screen Lwmax should be multiple of screen height h:

Distance between the first audience row and the screen Lwmin should stay in rela- tion with screen height as well. Lwmin / H > 1,5, Picture width is calculated based on the Picture height and aspect ratio:
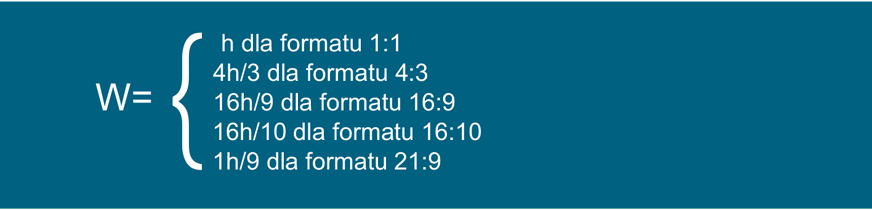
The screen should be installed at the ergonomic height, so the viewers could watch the displayed images comfortably.

Premises size, projector brightness, ambient light conditions should be kept in mind when calculating the screen size.
ADVANTAGES OF PROJECTION SCREENS AVERS SCREENS
SMART AND EASY INSTALLATION
Avers projection screens are designed for wall or ceiling installation. We have in- vented unique installation system to simplify the screen installation. Any of the in- stallation systems elements is no visible after the screen installation. There is only 1 mm distance between the screen cassette and the ceiling , so the screen seems to be glued to the ceiling. The installation rails integrated with the screen cassette, ceiling bracket and the locking bolt are the 3 elements of the system. Installation of the screens up to 3,5 meter in the base requires: to drill just 2 holes in the ceiling, fix the brackets with 2 anchors, slide the screen rail at the bracket hinges, turn the screen at the position and secure it with the locking bolts. It is possible to fine tune the installed screen position horizontally in case it occurs after installation the pic- ture is not displayed at the central position.
Screens dedicated for the in-ceiling installation at the recessed ceilings have dedi- cated modular design. There are 2 methods of screen installation depending on the recessed ceiling structure, screen surface is protected from dirt and damage during installation, inspections and maintenance of the installed screen are secured with the screen structure. The screen module and ceiling module remain hidden behind the masking module when the screen is installed. Disassembly of the masking mod- ule can be done by single person. It provides full access to all components of the screen behind.